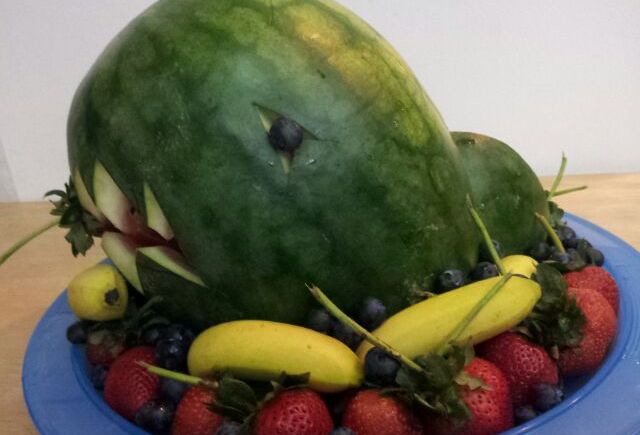
Watermelon Shark – healthy kids party food with some bite!

My first little boy was three yesterday. Such a big boy already. Ooops something in my eye… He insists he can pick me up already which is no mean feat.

AND, this week his preschool celebrated no less than three birthdays. That means a whole lot of cupcakes, muffins,and sweet birthday treats. Not that I am a stickler for birthday treats, hey, I cooked an Oreo cake.  Toddler sugar HIIIIIGGGGHHHHHHHHHH!

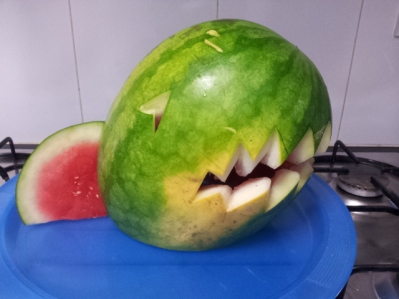
However, in the interests of introducing a little less sugar to school life and a bit more fruit, I opted to make a watermelon shark for the preschool party.  And, yes, I realise fruit contains natural sugar, but its also full of fiber, vitamins and nutrients, and its gotta be better than cake everyday right? In the least I enjoyed making it, and I think the kids had fun eating it to.

I originally saw a version of this on pinterest (I’m on there if you want to find me BTW) and I made my first watermelon shark for my youngest’s 1st birthday. It’s a bit like pumpkin carving, but unlike pumpkins, watermelons are plentiful in Singapore all year round, and a fraction of the cost.

So without further ado, here’s my step by step of how to make a watermelon shark.

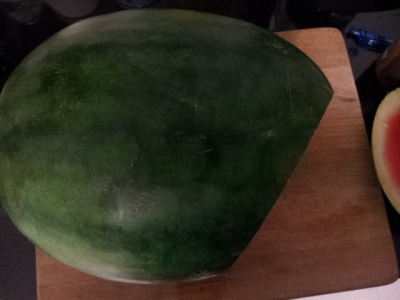
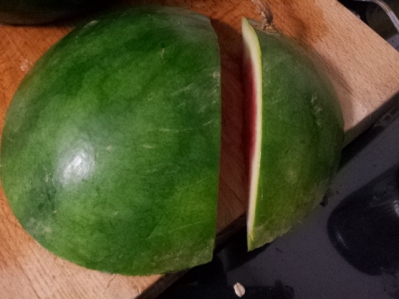
step 1. slice the end off the watermelon at an angle

Step 1. Slice the end off at an angle.

1. Take one large watermelon and a large long sharp knife. Slice the end of the watermelon off on a slight diagonal. You want your watermelon to stand on this flat end and look like a shark head jumping up out of the water.

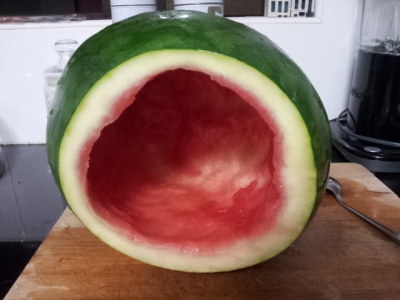
step 2 scoop out contents of melon

Step 2. Scoop out the flesh and seeds from your melon.

2. Scoop out the flesh of the melon. I save the flesh for eating and blending for smoothies. Leave a little flesh along the edge of the melon where the mouth will go as it adds a little extra gore as pink flesh or blood on the teeth!

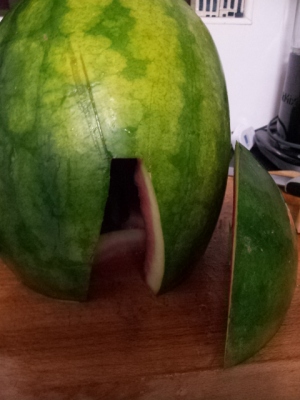
step 4 cut a vertical wedge out of the side of the melon

Step 3. Cut a vertical wedge out of the side of the melon.

3. Cut a vertical wedge up from the bottom (open) end of the melon. This is where your shark’s fin is going to slot in. So this will be the back of the ‘head’ of your shark.

step 5 cut your melon lid aka sharks fin diagonally across

Step 4. Cut your sharks fin (melon lid) diagonally

4. Take the lid of your melon and cut diagonally in to approximately 2/3 and 1/3. This is going to be the shark’s fin.

step 6 carve out your shark's mouth jaws

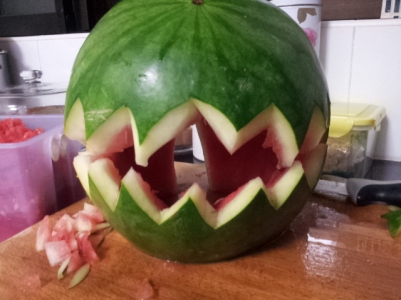
Step 5. carve out the jaws with teeth

5. Carve out your sharks jaw with teeth. You can use a permanent marker pen to mark out the teeth as a guide. If you cut at an angle you see a bit more of the white flesh of the melon which looks more like teeth.

jaws!

JAWS!

step 7 carve out the eyes

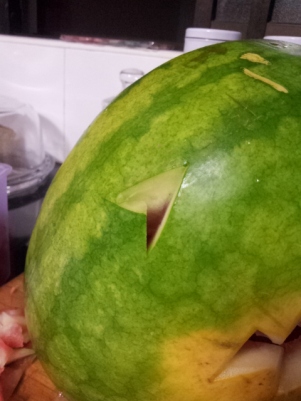
Step 7. Carve out the eyes

6. Carve out the eyes. You’ll insert a blueberry here later so don’t worry too much about the shape. I do a triangle so it looks a bit like a cartoon scary sharks eye.

step 8 insert your shark's fin and plate up

Step 7. Insert your shark’s fin and plate up

7. Slot your fin into the wedge at the back of the head and plate your shark up. I have a large round plastic blue tray which was perfect. Last time I used a regular large plate and cut some blue card out in wavy strips and sellotaped them to the plate around the shark to look like waves. This time I arranged my bananas to look like waves!

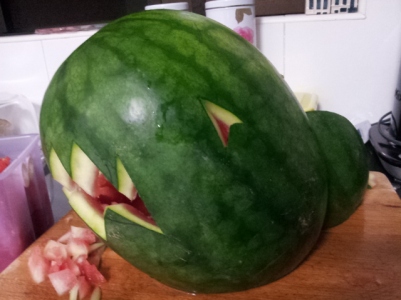
shark head carved and on blue tray

Shark head on my blue plate, photo of the other side

step 9 arrange fruit inside the jaws and on the plate

Step 8. Arrange fruit inside the jaws and on the plate

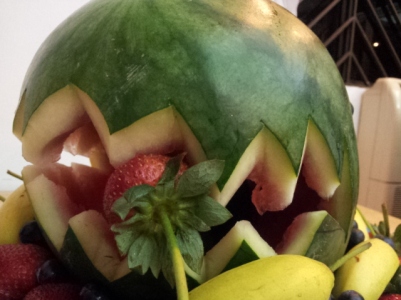
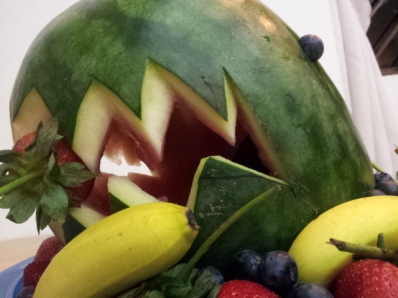
8. Arrange your pre-washed fruit around the head. Put your blueberries into the ocular cavities – which sounds so gross but reminds me of my favourite film ‘So I Married an Axe Murderer’.  Peculiar humour moi? You can put grapes inside the head, strawberries, blueberries and bananas all around. The version I saw originally had watermelon balls in the head but I found this got very wet and messy!

I wonder if a punch bowl would fit inside for the grown-ups next time?… Rum fruit punch with a bite!

watermelon shark bites!

Shark attack!

When only Oreo Cake will suffice…

I have been looking through my current favourite baking blog, Sally’s Baking Addiction for inspiration for middle son’s birthday cake, and here she is.  The Oreo Cake. In all its glorious gooeyness.

Oreo Cake. Image copyright Sally’s Baking Addiction. Original recipe taken from Amanda Rettke, Suprise-Inside Cakes.

I think I am losing my inhibitions when it comes to cooking what I previously thought of as shamefully simple confectionery packed desserts. What a toffee nose! Of course there is a sense of achievement when you cook a dessert technically difficult, but hey, I’m not on Master Chef. So, for now, masterchefs, keep your Sabayon, my reward is seeing the pure joy and pleasure my kids and friends get from a mouthful of straight-up soul food.

The party is Saturday, so off to shops to buy a bucket load of Oreo’s. Photo’s to follow 🙂

Follow this link for the Oreo Cake recipe.

Oreo Cake is taken from Amanda Rettke’s Surprise-Inside Cakes available from Amazon.

My adventures in East West fusion cooking…. the Kaya Brioche Bun

Kaya Pandan Buns

Kaya Pandan Brioche Buns

It had the makings of a pioneering culinary discovery, east meets west fusion cooking. Ladies and gentlemen I present the Kaya Pandan Brioche Bun. Could life get any sweeter? Middle son and me don’t think so.

Take one recipe for brioche, use the extracted pandan juice (see my pandan cake recipe to see how to extract the juice) from fresh pandan leaves to make the dough, and inject with Kaya jam ahead of cooking.

kaya brioche buns ready to bake

Ready to go in the oven

Kaya, and the Kaya bun are local Singaporean delights. Kaya is a jam made from egg yolks, coconut milk, and sugar and it looks a bit like lemon curd (for my UK readers).  We are big fans and have it spread on thick slices of white toast with plenty of butter. The perfect accompaniment to a morning cup of coffee.

Here’s what Wiki had to say…

Kaya, Serikaya or Srikaya (Malay: kaya; Indonesian: seri kaya; Tagalog: matamís sa báo, matamís na báo, or kalamay-hatì;Hokkien: 咖吔 ka-ia) is a food spread, a fruit curd made from a base of coconut milk, eggs and sugar. It is wildly popular in Southeast Asia, mainly in Malaysia and Singapore. The word kaya means rich in the Malay language and hence represents the texture of this popular food.
injecting kaya jam into brioche buns

Always one to have a go, me and two toddlers created the very first (as far as I know) Kaya Pandan Brioche Buns in our humble kitchen. It was fun, albeit messy.

The taste test…

To be honest, and I must be, they were a little dry. I did wonder where the jam had disapeared to in some of the buns, until my husband pointed out he had seen toddler#2 ‘express’ some of the buns straight to the cooking tray bypassing their jam injection.

Lesson learnt, more jam and in all the buns. I do also think I need a different dough mix, perhaps Brioche and Kaya are not destined for one another. But….

Kaya Donuts (Doughnuts for us Brits)…now your talking!!

Nigella’s Gloriously Simple Fatoush (Middle Eastern Green Salad)

Nigella Lawsons Feast cook book

Taken from one of my most loved cookbooks, Feast by Nigella Lawson. This Fatoush forms part of Nigella’s Mezze feast. If you buy just one of Nigella’s books buy this one.

The recipes are formatted into complete meal plans, starters, mains and desserts. So choosing a menu for a special evening or dinner party is a cinch! There are meal plans and recipes for religious holidays, children’s parties, romantic dinners for two, vegetarian dinners, and even a mezze for twenty people. It covers pretty much all angles! Plus there is a delicious chapter dedicated to chocolate cakes in all their glorious forms. Every single time I’ve cooked from this book – I’ve received lots of compliments – mmmmmmms and yummmmms.

I love this Fatoush recipe because it is a great way to serve a green salad with a difference.

The simple addition of some herbs, chillies and lime brings this salad to life. Whereas I would think twice about ‘just’ serving a green salad alongside a roast lamb joint, I have, and would serve a Fatoush as the main side. It’s simple and sophisticated. I’m not quoting this recipe word for word…but here are the essentials. Obviously presence of chillies means this isn’t a salad for the little guys.

Ingredients

4 spring onions
2 long green chillies (medium kick)
1 small to medium head of Cos or Romaine Lettuce
zest and juice of 1 lime
2 tbsp extra virgin olive oil
Maldon sea salt
1 ripe avocado
4 tbsp chopped coriander
4 tbsp torn mint (don’t chop it goes black)

Wash and finely slice the spring onions and chillies, put in a medium mixing bowl. Add zest and juice of lime, a good pinch of sea salt, and olive oil, give it all a mix. Clean and tear your lettuce into large bite size portions arrange on a large platter or in a bowl. De-seed avocado and scoop out flesh and arrange on top of lettuce. Chop coriander and tear mint leaves and scatter on top of salad. Finally generously scatter spring onion and chilli and dressing over the top of the salad. Enjoy!

Ooey Gooey Garlic Camenbert


I follow a blog called Food Fellowship and Wine and just received a post from the lovely Ms. Carla documenting a deliciously easy cheese starter or snack perhaps. In fact it is so easy she says you could do it for breakfast, lunch, dinner and snacks between.

Baked Camembert and glass of wine

image from Food Fellowship and Wine blog

A friend, Mr V, served up this melted Camenbert appetiser many moons ago and we all wondered at its sophistication yet simplicity… If I ever get asked in an interview “if you were a dish, what dish would you be?” I shall have to opt for this one. On second thoughts perhaps suggesting I am a slightly strong smelling cheese dish might not be so wise.

In another fortuitous coincidence I purchased my parents a  Camenbert baking dish for this very baking scenario a few christmas’ past, so the recipe clearly speaks to me. Thank you Carla for your wonderful post and reminding me what a delicious and simple dish this is to cook.

Here’s link…

Ooey Gooey Garlic Camenbert.

Rum (Pepper) Steaks

Easter hat and pina colada cocktail

Yet another silly hat in our house…introducing my son’s Easter ‘bonnet’ and my celebratory Pina Colada!

Rum Steaks were our Saturday/Easter weekend dinner, scroll down for the recipe.

A great excuse to mix up some ‘modern’ and low fat (made with coconut water not cream) Pina Colada cocktails on the side which were all too easy to drink. Here’s a picture of the Steaks, served with Sweet Potato and Courgette Wedges seasoned with Cayenne Pepper, Ground Coriander, Cumin, Pepper and Salt.

Steaks in Rum, Cream and Onion Sauce

And here’s the recipe for the Rum Steaks…

4 cloves garlic finely chopped or crushed
1 tsp salt
1/2 tsp freshly ground black pepper
1 tbsp red wine
4 rib eye steaks (or your preference)
50g salted butter
2 medium brown or white onions sliced thinly
2 tbsp dark rum (or white if yo don’t have dark)
1 tbsp whole black peppercorns
1/2 cup single cream

Combine garlic, salt, ground pepper and wine in a small bowl. Arrange steaks on a plate, spread wine marinade over the top and refrigerate for 1 hour plus. Melt butter in medium heavy based frying pan; sear steaks over high heat for 1 minute each side. Set steaks aside in a warm place. Reduce heat to medium, add onions to the pan, cook until onions softens and begins to brown. Add rum and peppercorns, stir well. Reduce heat to low, add cream, stir. Bring sauce to boiling point, remove from heat. Pour sauce over steaks and serve.

Friday’s Nonya Chicken Curry Recipe

Nonya chicken curry

Elaine’s Nonya Chicken Curry


This is the recipe I’m going to be trying tomorrow. Will keep you posted on how it turns out. I have made up a slight deviation aleady which is, lemongrass chicken stock to use for extra liquid. I have taken yesterdays’ roast chicken carcass boiled up with onion, celery, lemongrass, green chilli and few cloves of garlic. I forgot I had it on the hob and I was wondering what delicious dish my neighbour was cooking!! All bodes well.

Nonya Chicken Curry | Nomsies Kitchen – http://pinterest.com/pin/481603753877686862/?s=3&m=wordpress

The update…man oh man. It tasted sooooo damn good! As I usually go off piste with recipes, this curry was much the same. I didn’t have coconut milk to hand so used coconut oil to fry up the spices and evaporated milk later on. I also didn’t have fennel in my herb cupboard but I do have Chinese Five spice which contains star anise, so used that instead. It smelt and tasted fantastic and I will definitely be making it again. Key ingredient in this curry is the star anise or fennel, it is what sets it apart from Indian or Thai curries.

jar of coconut oil, evaporated milk and chinese five spice

My supplementary ingredients…

Bad Boy Bass

wpid-20150128_194838.jpg

Thank you Heng’s for making a super easy and tasty fish supper for me and Mr X. So tasty in fact I decided to blog about it. Best of all your delicious sauce contained no MSG or preservatives and it was indeed quick and easy. My cooking equipment included the oven, a pair of scissors, some aluminium foil and a cooking tray. easy lah.

I happened upon the sauce during one of my browsing sessions of the weird shit section of the supermarket. It’s not that weird I concede, but you should have seen some of the stuff it was alongside!! All I needed to do next was buy a bargain priced sea bass at NTUC supermarket ($5 people, that’s about £2.50 for my UK followers), gutted and cleaned or course. No fishy guts on this moms hands!

I cooked it, served it with boiled Basmati rice and simple steamed corn on the cob. Delicious, nutritious and quick. Will be doing again. Here’s a piccie pre-bake….and yes for all you lily livers it has the head on it still, oh grow a pair.  My Singaporean reader’s will be wondering what I am on about – don’t worry it’s a peculiar British thing that people like to pretend their headless fish were born that way!

wpid-20150128_195824.jpg


BTW – in case you didn’t guess this recipe is for mum and dad, bloody spicy.

Put the lime in the coconut and drink it right up!

Okay, it’s not a drink, but I cannot write about coconut without this great song popping into my head. Blogging on Friday night, I clearly need a Pina Colada!

So here goes, play the clip and read on…

I think I may have stumbled upon a secret ingredient, although now it’s not so much of a secret…but hey I am all about the sharing people. Want a crunchy, light crumble? Easy! Add coconut to your crumble mix.

wpid-20150123_112736.jpg

I have been making crumble for approximately 30 years, so I don’t follow a recipe anymore. I will endeavor to weigh the ingredients next time so I can let you know.

I use butter (not margarine), plain or self-raising flour whichever is to hand, and a few tablespoons of caster sugar. I’ve added oats in the past, roughly chopped almonds, cinnamon, and or lemon rind…these ingredients all help to add a bit more flavour or crunch or nutrition. Last week I decided to do a tropical version and included mango and apple in the filling (yummy), and I added approximately 4 tablespoons of desiccated coconut to the crumble mix.  The coconut added a noticeable lightness to the crumble without it becoming floury – I will definitely use it again.

Some other fillings I have tried in the past you might like to try…
Rhubarb (with some sugar to sweeten), Apple, Pear and Apple, Rhubarb and Strawberry, Apple and Blackberry, Apple and Blueberry, Mango and Apple, and Pineapple and Apple.

wpid-20150123_135427.jpg